Interactive dashboards are the cornerstone of effective data visualization, and adding a search bar in Tableau can significantly enhance user experience. By enabling users to filter data dynamically, a search bar makes it easier to find specific information within large datasets.
In this step-by-step guide, you’ll learn how to create a search bar in Tableau using parameters, calculated fields, and filters.
Why Add a Search Bar in Tableau?

A search bar brings several advantages to Tableau dashboards:
- User-Friendly Navigation: Helps users filter data quickly and efficiently.
- Enhanced Interactivity: Allows users to focus on specific data points.
- Scalability: Makes large datasets manageable for non-technical users.
By enabling custom searches, you make your dashboards more interactive and valuable for decision-making.
Prerequisites for Adding a Search Bar
Before getting started, ensure you have the following:
- Tableau Desktop Installed: The search bar functionality is created within Tableau Desktop.
- Dataset Loaded: A dataset ready to use for filtering purposes.
- Basic Understanding of Tableau Parameters: Familiarity with parameters and calculated fields is helpful.
Step-by-Step Guide to Creating a Search Bar in Tableau
Follow these steps to add a functional search bar to your Tableau dashboard.
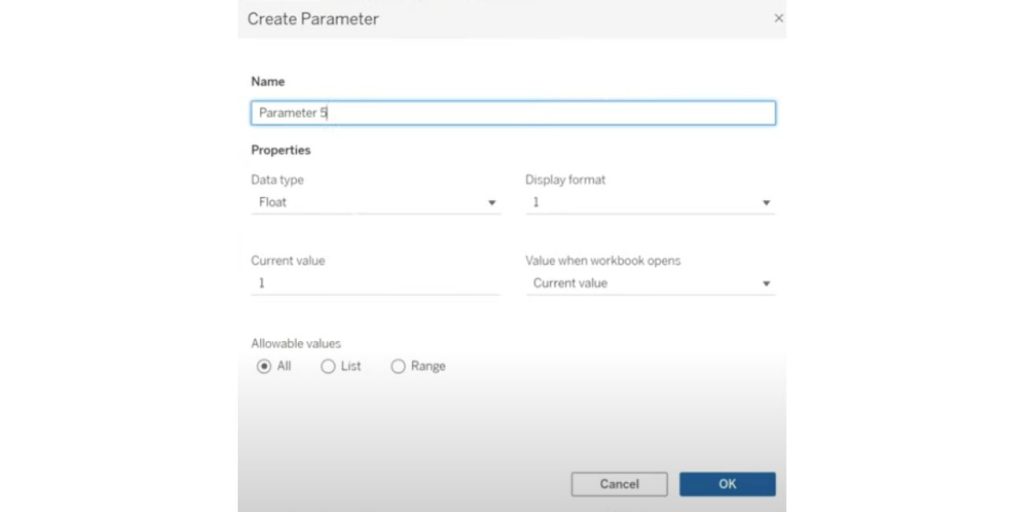
Step 1: Create a Parameter

The parameter will act as the input box where users can type their search query.
- In Tableau, go to the Data Pane and click on Create Parameter.
- Name the parameter (e.g., “Search Input”).
- Set the Data Type to String (text input).
- Choose the option Allowable Values: All to allow users to input any value.
Pro Tip: Use a descriptive name for the parameter to make it easier to identify later.
Step 2: Create a Calculated Field
The calculated field links the parameter to your data, enabling dynamic filtering based on the search input.
- Right-click in the Data Pane and select Create Calculated Field.
- Name the calculated field (e.g., “Search Filter”).
- Enter the following formula:
CONTAINS([Field Name], [Search Input])
Replace
[Field Name]with the column you want to filter (e.g., “Customer Name”). - Click OK to save the calculated field.
How It Works: The
CONTAINSfunction checks whether the input matches any values in the selected field.
Step 3: Add the Calculated Field as a Filter
Now, use the calculated field to filter your data based on the search input.
- Drag the calculated field (“Search Filter”) to the Filters Shelf.
- In the filter dialog box, select True to display rows that match the search query.
Tip: Test the filter by typing values into the parameter to ensure it’s working as expected.
Step 4: Display the Parameter Control
To make the search bar visible and usable on the dashboard, display the parameter control.
- Right-click the parameter (“Search Input”) in the Data Pane.
- Select Show Parameter.
- Position the parameter control where you want it on the dashboard.
Enhancing the Search Bar for Better Usability
Once the search bar is functional, you can enhance it for a better user experience.
Add Placeholder Text
Placeholder text provides a visual cue to guide users on how to use the search bar.
- Right-click the parameter control and select Edit Parameter.
- Add instructions like “Type here to search” in the parameter description.
Style the Search Bar
Styling makes your dashboard visually appealing and user-friendly.
- Font and Color: Customize fonts and colors in the parameter control settings.
- Size and Placement: Adjust the size and position of the search bar for better visibility.
Pro Tip: Keep the design consistent with the overall dashboard theme.
Test Interactivity
Testing ensures the search bar works as intended.
- Enter various inputs to confirm the filter displays the correct results.
- Check for edge cases, like empty inputs or invalid characters.
Common Mistakes and Troubleshooting
Adding a search bar can involve challenges. Here’s how to address common issues:
Parameter Not Filtering Correctly
- Check Formula: Ensure the calculated field uses the correct syntax (
CONTAINS([Field Name], [Search Input])). - Verify Data Types: Make sure the parameter data type matches the field being filtered.
Search Bar Input Not Updating
- Check Parameter Connection: Ensure the parameter is correctly linked to the calculated field.
- Refresh Dashboard: Sometimes changes require refreshing the dashboard to take effect.
Use Cases for a Search Bar in Tableau
Search bars are particularly useful for:
- Filtering Large Datasets: Quickly find specific customer names, product IDs, or categories.
- Exploring Specific Regions: Narrow down data by location or demographic.
- Enhancing Presentations: Allow viewers to interact with dashboards during live presentations.
Advanced Tips for Creating Search Bars
Take your search bar to the next level with these advanced techniques:
Use Wildcard Matching
Enable partial matches for broader searches. For example, typing “Mar” could match “Marketing” or “Martin.”
Combine Search Bar with Other Filters
Create a layered filtering experience by combining the search bar with dropdown menus, sliders, or date filters.
Example: Use a search bar to filter by product name while using a dropdown to filter by region.
Conclusion
Adding a search bar in Tableau enhances dashboard interactivity, making it easier for users to find specific data points. By following this guide and using parameters, calculated fields, and filters, you can create a functional and user-friendly search bar. Don’t forget to test and style your search bar to align with the overall design of your dashboard.
Start implementing a search bar in your Tableau dashboards today and empower users with a seamless data exploration experience!

