Using the Inspect Element tool in your web browser is a powerful way to experiment with webpage designs, test different looks, or even learn CSS. With this tool, you can temporarily edit elements on a webpage, including images, without affecting the original site. This guide walks you through using Inspect Element to change image styles, adjust sizes, and preview design changes.
What is Inspect Element?

The Inspect Element tool allows you to view and temporarily edit HTML and CSS code on a webpage. You can change an image’s size, apply different styles, or even replace it with another image – but remember, these changes are local. They only apply to your view and won’t affect the original website.
Benefits of Using Inspect Element for Image Editing
- Quick Testing: You can test how different images or styles look on a webpage.
- Design Experimentation: Try different effects, alignments, or colors without permanent changes.
- Learning Tool: It’s great for learning HTML and CSS since you can immediately see the effects of code changes.
Accessing Inspect Element in Different Browsers
You can open Inspect Element on most web browsers with a few clicks or a keyboard shortcut:
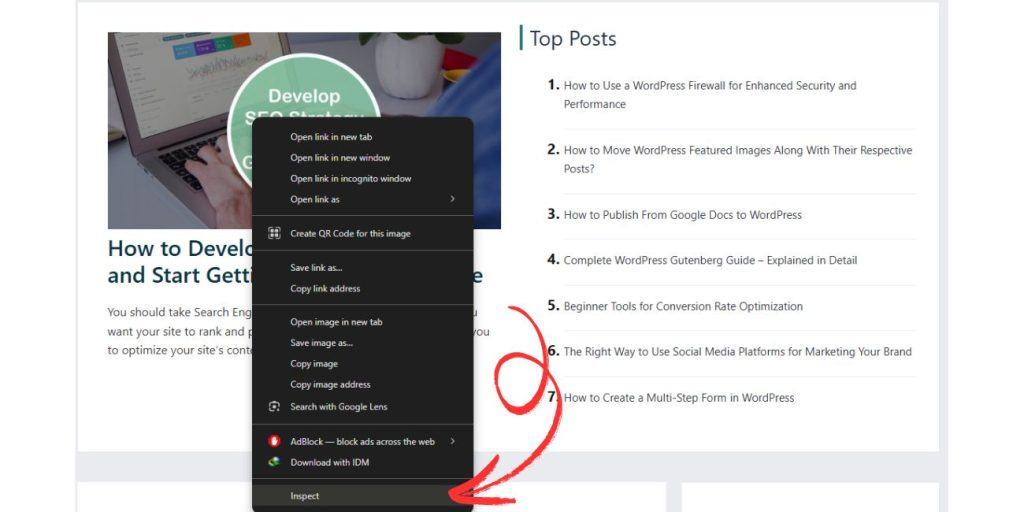
- Chrome: Right-click anywhere on the page and select Inspect. Or press
Ctrl+Shift+I(Windows) orCmd+Option+I(Mac). - Firefox: Right-click and select Inspect Element or use the same shortcuts.
- Safari: Enable Develop Mode (Preferences > Advanced > Show Develop menu in menu bar), then right-click and choose Inspect Element.
- Edge: Right-click and select Inspect.
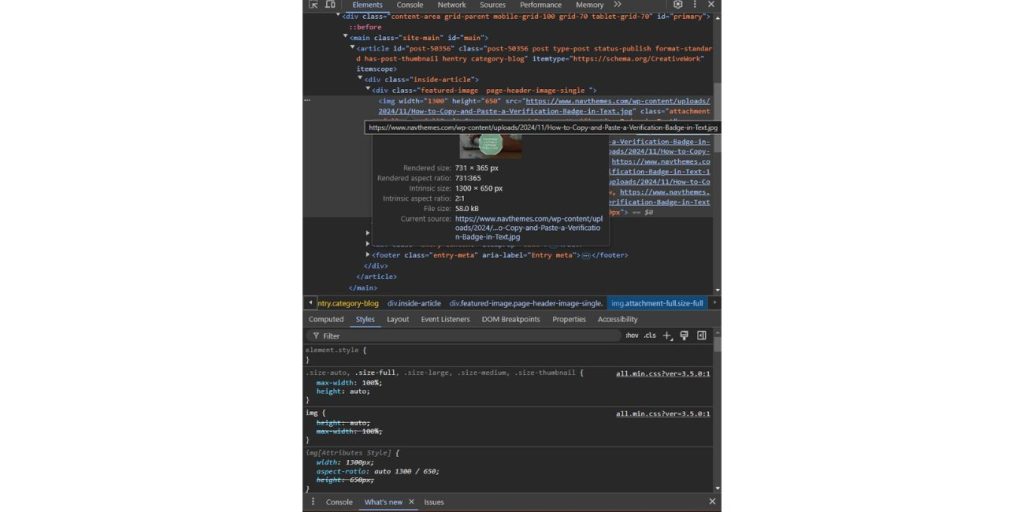
Once open, you’ll see the Elements panel, where HTML structure and CSS styling are displayed.
Basic Image Editing Techniques with Inspect Element

Editing images with Inspect Element allows you to adjust their appearance in various ways. Here are some quick and easy methods:
Changing the Image Source (URL)
To replace an image with a different one, follow these steps:
- Right-click on the image you want to replace and select Inspect.
- In the Elements panel, look for the
srcattribute within the<img>tag. - Double-click the current URL and replace it with a new image URL. Press Enter.
This lets you preview how a different image would look on the page.
Adjusting Image Size and Dimensions
You can also change an image’s size by editing its width and height in the CSS:
- In the Styles panel (usually on the right), look for
widthandheightunder the image’s CSS properties. - Adjust these values to resize the image. Try values like
100pxor50%for different effects.
Advanced Image Editing Options
For those wanting to dive deeper, here are some advanced ways to edit images with Inspect Element:
Applying CSS Filters to Images
CSS filters can add various effects like grayscale, blur, or brightness:
- In the Styles panel, add a new CSS rule by typing
filter: grayscale(100%);orfilter: brightness(150%);. - Experiment with different filters like
blur(5px),contrast(120%), oropacity(0.7)for interesting effects.
Adding Borders, Shadows, and Rounding Corners
Borders and shadows can make images stand out:
- Border: Add
border: 2px solid #000;to give an image a black border. - Shadow: Try
box-shadow: 5px 5px 10px rgba(0,0,0,0.5);for a subtle shadow. - Rounding Corners: Use
border-radius: 50%;to make an image round or10pxfor softer edges.
Replacing Images with Local Files
To temporarily replace an image with one from your computer, you can use Data URLs or CSS background-image techniques:
- Data URLs: Convert your image to a Base64 Data URL and paste it in the
srcattribute of the<img>tag. This is handy for testing local images without uploading them. - CSS Background Image: Use
background-image: url('your-image-url');in CSS if you prefer a custom background.
Troubleshooting Common Issues in Inspect Element
Sometimes, things might not work as expected. Here are some quick fixes:
- Changes Disappear on Refresh: Remember that Inspect Element edits are temporary. When you refresh the page, the changes are reset.
- Image Cache Issues: If the image isn’t changing as expected, try a hard refresh (
Ctrl+Shift+RorCmd+Shift+R) to bypass the browser cache.
Best Practices for Using Inspect Element for Image Edits
- Experiment Carefully: Since changes are temporary, feel free to experiment! But remember, these aren’t saved changes.
- Practice CSS and HTML: Use Inspect Element as a learning tool. Experiment with CSS styles, and learn how images and other elements are styled and positioned on the page.
- Keep it Ethical: Inspect Element is for viewing and local testing only – avoid making unauthorized changes or edits on live sites.
FAQs on Editing Images with Inspect Element
Can I permanently save changes made in Inspect Element?
No, changes made in Inspect Element are only temporary and reset when the page is refreshed.
How do I change an image without affecting the original website?
Edits in Inspect Element only affect your local browser view and do not change the actual website for others.
Why can’t I see my changes after refreshing the page?
Inspect Element changes aren’t saved, so refreshing the page restores the original code.
What CSS properties can I use to style images in Inspect Element?
You can use properties like width, height, filter, border, box-shadow, and border-radius to style images.
Can I replace images on any website using Inspect Element?
Yes, you can temporarily replace images on most websites, but remember, these changes are local and for personal testing only.
Editing images in Inspect Element can be a great way to learn, experiment, and preview different styles on a webpage. Whether you’re changing sizes, adding effects, or testing new images, this tool lets you make edits quickly and easily. Try it out, and see how Inspect Element can help you understand more about web design!
Got questions or want to share your experience with Inspect Element? Drop a comment below!

