Audacity is a powerful and free audio editing tool, but many users struggle with exporting their projects as MP3 files. This guide will walk you through the process of exporting MP3 files from Audacity, including preparing your project, setting up the necessary encoder, troubleshooting common issues, and optimizing your audio for the best results.
What Does Exporting Mean in Audacity?

Exporting in Audacity refers to saving your edited audio project in a specific format that can be used outside the application, such as MP3, WAV, or FLAC. MP3 is one of the most popular formats because of its small file size and compatibility with most devices and platforms.
Preparing Your Project for Export
Before exporting your audio, ensure it’s ready for the final step:
- Edit and Trim: Remove unwanted sections, background noise, and silences from your project.
- Normalize the Audio: Use the “Normalize” effect in Audacity to ensure your audio levels are consistent.
- Check Sample Rate: Go to Edit > Preferences > Quality and ensure your sample rate is set to 44.1 kHz, which is standard for MP3 files.
- Save Your Project: Save your Audacity project file (File > Save Project As) to ensure you have a backup before exporting.
Requirements for Exporting MP3 Files
To export MP3 files in Audacity, you need to install the LAME MP3 encoder. This encoder allows Audacity to create MP3 files, as it doesn’t include native MP3 support due to licensing restrictions.
Installing the LAME MP3 Encoder
- Download the LAME Encoder: Visit the official Audacity website or trusted sources to download the LAME encoder for your operating system.
- Install the Encoder: Follow the on-screen instructions to install the encoder on your computer.
- Verify Installation: Open Audacity, click Edit > Preferences > Libraries, and ensure the MP3 export option is enabled.
Step-by-Step Guide to Export MP3 Files
Once your project is ready and the LAME encoder is installed, follow these steps to export your file as an MP3:
- Save Your Work:
- Save your project file to prevent data loss if something goes wrong during export.
- Access Export Options:
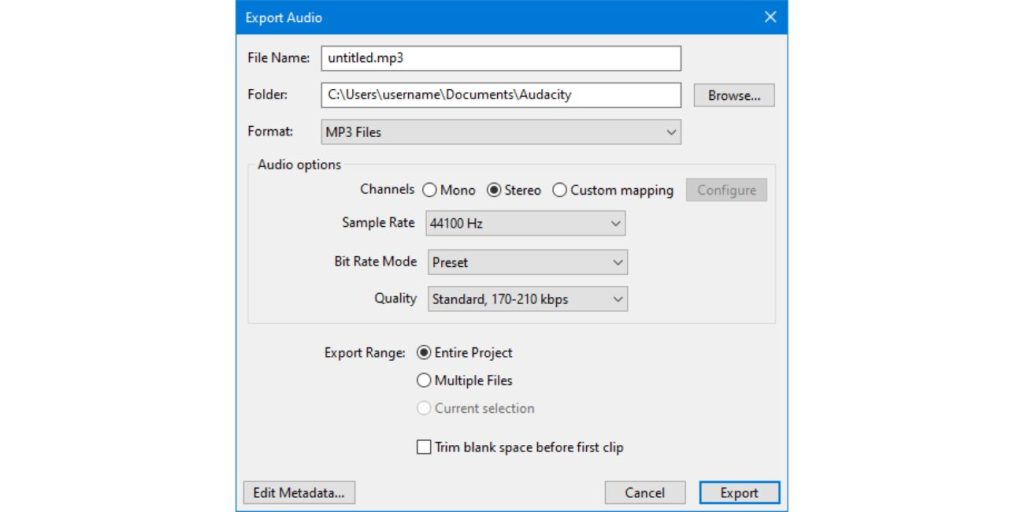
- Click on File > Export > Export as MP3.
- Choose Export Location:
- Select the folder where you want to save the MP3 file and name your file.
- Set Export Parameters:
- Choose your desired quality settings:
- Bitrate Mode: Select between Constant Bitrate (CBR) or Variable Bitrate (VBR).
- Quality: For higher quality, choose 192kbps or 320kbps.
- Choose your desired quality settings:
- Add Metadata:
- Fill in metadata tags like title, artist, album, and genre. This is optional but helps organize your files.
- Export:
- Click Save to export your MP3 file. Audacity will process the file, and your MP3 will be saved to the selected location.
Understanding MP3 Export Settings

When exporting MP3 files, the following settings influence the file size and quality:
Bitrate
The bitrate determines the amount of data processed per second in an MP3 file, directly impacting its quality and size.
- Lower Bitrates (e.g., 128kbps):
Files encoded with lower bitrates have smaller sizes but reduced sound quality. These are suitable for applications where file size is critical, such as streaming over limited bandwidth or storing large libraries on limited storage devices.
Use Case: Podcasts or spoken audio where ultra-high quality isn’t necessary. - Higher Bitrates (e.g., 320kbps):
Files with higher bitrates offer better audio quality, preserving more details of the original sound. However, this results in significantly larger file sizes.
Use Case: Music or professional-grade audio projects where sound clarity is a priority.
Bitrate Mode
Bitrate mode affects how the bitrate is distributed throughout the audio file, influencing both quality and size.
- CBR (Constant Bitrate):
- Ensures that the same bitrate is used for the entire file.
- Provides predictable file sizes and consistent quality.
- Ideal for situations where uniformity is needed, such as compatibility across a wide range of devices.
Use Case: Streaming services or platforms requiring consistent quality.
- VBR (Variable Bitrate):
- Adjusts the bitrate dynamically based on the complexity of the audio at different points.
- Results in a better balance of quality and file size, as it allocates higher bitrate to complex sections and lower bitrate to simpler parts.
Use Case: Music tracks with varying audio complexity, such as orchestral pieces.
Stereo vs. Mono
This setting controls whether the audio retains separate left and right channels (stereo) or combines them into a single channel (mono).
- Stereo:
- Retains the left and right audio channels, preserving the full depth and spatial details of the sound.
- This results in richer, more immersive audio experiences.
- Slightly increases file size compared to mono.
Use Case: Music, movies, or any audio requiring a wide soundstage.
- Mono:
- Combines both audio channels into one, reducing the file size while maintaining essential audio details.
- Useful for recordings where stereo separation isn’t critical, such as voiceovers or podcasts.
Use Case: Dialogue-heavy content or space-constrained storage scenarios.
Troubleshooting MP3 Export Issues
If you encounter problems while exporting MP3 files, here are common issues and fixes:
- LAME Encoder Not Detected:
- Ensure the LAME encoder is installed and configured in Audacity’s Preferences > Libraries section.
- Export Error Messages:
- Check file permissions for the export folder or choose a different location.
- Distorted or Low-Quality MP3s:
- Increase the bitrate setting during export to improve audio quality.
- Metadata Not Saving:
- Ensure you fill out all metadata fields before exporting and save the changes.
Advanced Export Options
Audacity also offers advanced exporting features for specific needs:
- Export multiple tracks as individual MP3 files using the “Export Multiple” option under the File menu.
- Use Audacity’s macro feature to automate repetitive tasks like exporting files in bulk.
- Add detailed metadata tags to organize your MP3 files professionally.
FAQs About Exporting MP3 Files from Audacity
1. Do I Need the LAME Encoder to Export MP3 Files?
Yes, Audacity requires the LAME encoder to export MP3 files. It can be downloaded and installed for free.
2. What Is the Best Bitrate for MP3 Files?
For general use, 192kbps offers a good balance between quality and file size. For professional use, opt for 320kbps.
3. Can I Export MP3s Without Metadata?
Yes, metadata is optional. If you leave the fields blank, Audacity will export the file without tags.
4. How Do I Export Multiple Tracks as Separate MP3 Files?
Use the “Export Multiple” option under the File menu and assign labels to your tracks before exporting.
Conclusion
Exporting MP3 files from Audacity is straightforward once you’ve set up the LAME encoder and optimized your project. By following this step-by-step guide, you can ensure high-quality MP3 exports tailored to your needs. Whether you’re creating a podcast, music track, or voiceover, Audacity provides all the tools you need for professional results.

